So sorry! Long time no see... I'm still alive. ...Ha? You don't care about me but only worrying about GTO...? Yes, it's still ongoing.
Today's post is about the seats.
I prefer the side curve of Fujimi's than Revell's, but both sheets were not sexy enough. I cut Fujimi's seat in two...
Then dug it. Don't care what you can see over there with crack. I dug the hole and put a magnet to hold the door, but the plan was cancelled for some reason.
Lower too, I dug.
Centre part was from 0.5 plastic paper, bended in hot water. 8 cells were drawn by pencil, .You can easily draw them freehand.
Ever Green's 1.5mm half round was just fit!! Thanks for making it easier!
Looked like money bugs.
Then both sides were cut. Still a bit too much rounded.
Top of cells were sanded, and the grommet were marked and drilled (0.5mm) later.
I used Nitto's insulating tape for black ribbons. It shows good textures! (I can say it doesn't has to be Nitto's).
Only the head rests were from Revell's box (on the left). Fujimi's; on the right, were not sexy at all...
The back panels were from 0.5mm plastic papers.
The seam lines were 0.3mm plastic strings, adhered by normal plastic glue.
Head rests were jointed by 0.3mm brass rods. Middle of the seats were dug deeper fitting the centre parts.
Centre parts were painted in flat red. The surfacers were applied on outer ones.
Using needles, the grommet holes were made.
I cut many ribbons in other width, then choose and fit into each grooves.
Looking good to me.
Sides were painted in flat black (could be semi-gross black, but I had only flat black paint marker; don't need to care too much;).
The outer ones were painted in semi-gross black + Tamiya splay SP-63 NATO black. Mixing ratio was about 50:50.
It was hard to adhere upper and lower parts because of the lack of the places to glue. I held my breath and applied the normal glue for plastic in tiny area and propped the seats up against camera (if not camera it was no prob but there it was).
Stays were not sexy neither. I attached 0.5mm plastic papers on top.
The top part was sanded to fit to the upper seat part. Another 0.5mm plastic paper was attached to fit to lower part of the seat. I adjusted one by one struggling with my old eyes (following picture). I am sure I am getting presbyopia.
Another source of headache. I flattened the 0.3mm brass rod, bent and the black CA glue was applied on one side.
Yes, it was lever handle.
Now I can say my GTO's seats are sexy enough.
They are sexy too seeing from the back:) Sorry, the picture is not good enough.
That's all for today. ...?
....Don't say "how's it going with the body!" I'll finish polishing it this weekend so I'll report about it later. To be honest, I struggled so much to adjust the color on each panels because I painted separately (you can say I was stupid). But now the problem was solved and overcoated by clear.
See you after!! (Not too long)
Friday, September 6, 2013
Sunday, July 7, 2013
Ferrari 288GTO Revell + Fujimi #26 (Work in Progres)
Loong time no see.....!!!!! I am so sorry for long absence. I've been working, working and working... The worst thing was, I got terrible numbness on my left hand. I could hardly hold my precious GTO's parts.
But just gradually, I'm keeping it in progress.
First of all, the report of an terrible accident....
Homicide scene?? No, don't be afraid.
This is the criminal.
I replaced the paint from tin spray into the bottle, then I close the lid not taking enough time for the pressure to go out. When I was happily trying to paint my GTO's body I released the lid... then, "BANG!!!".
.... Please learn from my stupid, shocking experience. If you are replacing the tin spray's paint into the bottle, don't close the lid so soon. Let it just release the pressure in the paint (it contains pressure much more than you think). I should have leave it for hours without closing the lid on.
Anyway, I've cleaned the mess finally. The best thing was, my GTO's body had escaped from this unexpected paint attack!! God bless my GTO.... I really appreciate.
So I can't post the paint thing 'cause my day ended up with cleaning, but I'll post some other progresses.
I choose Revell's mirror. Fujimi's are too small. But still Revell's mirror stay were too skinny.
So I applied 0.5mm plastic papers on the stay, as you can see.
Using files and sand papers, the mirrors were made to be preferable shapes.
Then front window. I don't use the "heat press' technique (don't say I have no press machine), but simply curved by putting in boiled hot water (of course I curved after taking the part off from hot water). I used 0.2mm transparent plastic board.
It took nearly 2 hours to adjust it.
Copying the rear window's shape to the masking tape...
I used the same technique on the rear window, by putting it in hot water. I believe it's much easier than the heat press.
The side-rear windows were a bit easier. 0.3mm white plastic papers were glued onto the 0.2mm transparent plastic board.
Then curved in the same method. The transparency is much better than the original parts!
Still sober works continued before painting the body. These tiny small things were cut from plastic rod.
Pointing the preferable position by using the maker...
The tiny small things were glued with acrylic bond.
I sanded on top because I found they were a bit exaggerated.
From plastic pipes and rod, I made the radiator tank. Over there you can see Hasegawa's 328GTB's radiator tank, as reference.
This is rear bumper. Since the original was just plane, I dug it and reshaped by applying 0.5mm plastic papers. The stay of the plate light bulb was cut from plastic rod. After painting, I'll put the light bulb parts from my junk.
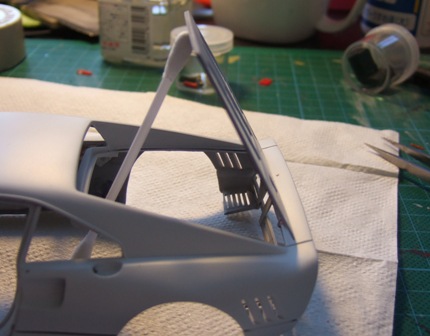
The ceiling was originally from Revell's transparent part. Putty and sanding were applied.
The roll cage... was made from plastic rods, but need to be lengthen up to the bottom of side windows.
And side air intakes. The holes were applied.
..... I was supposed to post the painting progress, indeed. Please put it aside until next post.
Thanks for looking (and thanks for waiting so long)
See you soon!
But just gradually, I'm keeping it in progress.
First of all, the report of an terrible accident....
Homicide scene?? No, don't be afraid.
This is the criminal.
I replaced the paint from tin spray into the bottle, then I close the lid not taking enough time for the pressure to go out. When I was happily trying to paint my GTO's body I released the lid... then, "BANG!!!".
.... Please learn from my stupid, shocking experience. If you are replacing the tin spray's paint into the bottle, don't close the lid so soon. Let it just release the pressure in the paint (it contains pressure much more than you think). I should have leave it for hours without closing the lid on.
Anyway, I've cleaned the mess finally. The best thing was, my GTO's body had escaped from this unexpected paint attack!! God bless my GTO.... I really appreciate.
So I can't post the paint thing 'cause my day ended up with cleaning, but I'll post some other progresses.
I choose Revell's mirror. Fujimi's are too small. But still Revell's mirror stay were too skinny.
So I applied 0.5mm plastic papers on the stay, as you can see.
Using files and sand papers, the mirrors were made to be preferable shapes.
Then front window. I don't use the "heat press' technique (don't say I have no press machine), but simply curved by putting in boiled hot water (of course I curved after taking the part off from hot water). I used 0.2mm transparent plastic board.
It took nearly 2 hours to adjust it.
Copying the rear window's shape to the masking tape...
I used the same technique on the rear window, by putting it in hot water. I believe it's much easier than the heat press.
The side-rear windows were a bit easier. 0.3mm white plastic papers were glued onto the 0.2mm transparent plastic board.
Then curved in the same method. The transparency is much better than the original parts!
Still sober works continued before painting the body. These tiny small things were cut from plastic rod.
Pointing the preferable position by using the maker...
The tiny small things were glued with acrylic bond.
I sanded on top because I found they were a bit exaggerated.
From plastic pipes and rod, I made the radiator tank. Over there you can see Hasegawa's 328GTB's radiator tank, as reference.
This is rear bumper. Since the original was just plane, I dug it and reshaped by applying 0.5mm plastic papers. The stay of the plate light bulb was cut from plastic rod. After painting, I'll put the light bulb parts from my junk.
The ceiling was originally from Revell's transparent part. Putty and sanding were applied.
The roll cage... was made from plastic rods, but need to be lengthen up to the bottom of side windows.
And side air intakes. The holes were applied.
..... I was supposed to post the painting progress, indeed. Please put it aside until next post.
Thanks for looking (and thanks for waiting so long)
See you soon!
Sunday, April 28, 2013
Ferrari 288GTO Revell + Fujimi #25 (Work in Progres)
Sorry again, I was away so long...
Just to let you know I'm still alive, let's start posting:)
Hinges for engine hood. 0.5mm nickel silver rods and 0.6mm (inside) brass tubes. Plastic pieces are the stays for hood.
Adjusted several times, then I was satisfied.
But the hinges hit to the air cleaner parts... again I cut and pasted. Upside is the cut one.
Attaching the exhaust pipes. I again put the magnets 'cause I found these pipes have to be movable when the body and chassis joint, otherwise these pipes will hit to the body.
Adjusted to certain position.
That's all today:) I'll do my best to make time and finish this project ASAP.
Thanks for looking!
Just to let you know I'm still alive, let's start posting:)
Hinges for engine hood. 0.5mm nickel silver rods and 0.6mm (inside) brass tubes. Plastic pieces are the stays for hood.
Adjusted several times, then I was satisfied.
But the hinges hit to the air cleaner parts... again I cut and pasted. Upside is the cut one.
Attaching the exhaust pipes. I again put the magnets 'cause I found these pipes have to be movable when the body and chassis joint, otherwise these pipes will hit to the body.
Adjusted to certain position.
That's all today:) I'll do my best to make time and finish this project ASAP.
Thanks for looking!
Subscribe to:
Posts (Atom)